
The DRAM light on motherboard means your board can't detect or properly initialize your RAM. It's part of a built-in debug LED system — called Q-LED on ASUS boards, EZ Debug LED on MSI, and Status LED on Gigabyte — that flags exactly where your boot process failed. In most cases, it's fixed by reseating your RAM, and you'll be back up and running in under 15 minutes.
Now let's break down exactly why it happens and how to fix it, step by step.
So your PC won't boot, and there's a little light glowing next to the word "DRAM" on your motherboard.
I get it. It's scary.
You're staring at a blank screen, your fans are spinning, but nothing's happening — and that tiny light feels like it's mocking you.
Here's the good news: I've dealt with this exact problem more times than I'd like to admit, and in almost every case, it's fixable fast.
In this guide, I'm going to walk you through exactly what that DRAM light means, why it turns on, and — step by step — how to fix it for good.
Let's dive in.
What Does the DRAM Light On Motherboard Actually Mean?
Before you touch a single screw, you need to understand what you're dealing with.
Because honestly? Most people panic first and troubleshoot second. Let's flip that order.
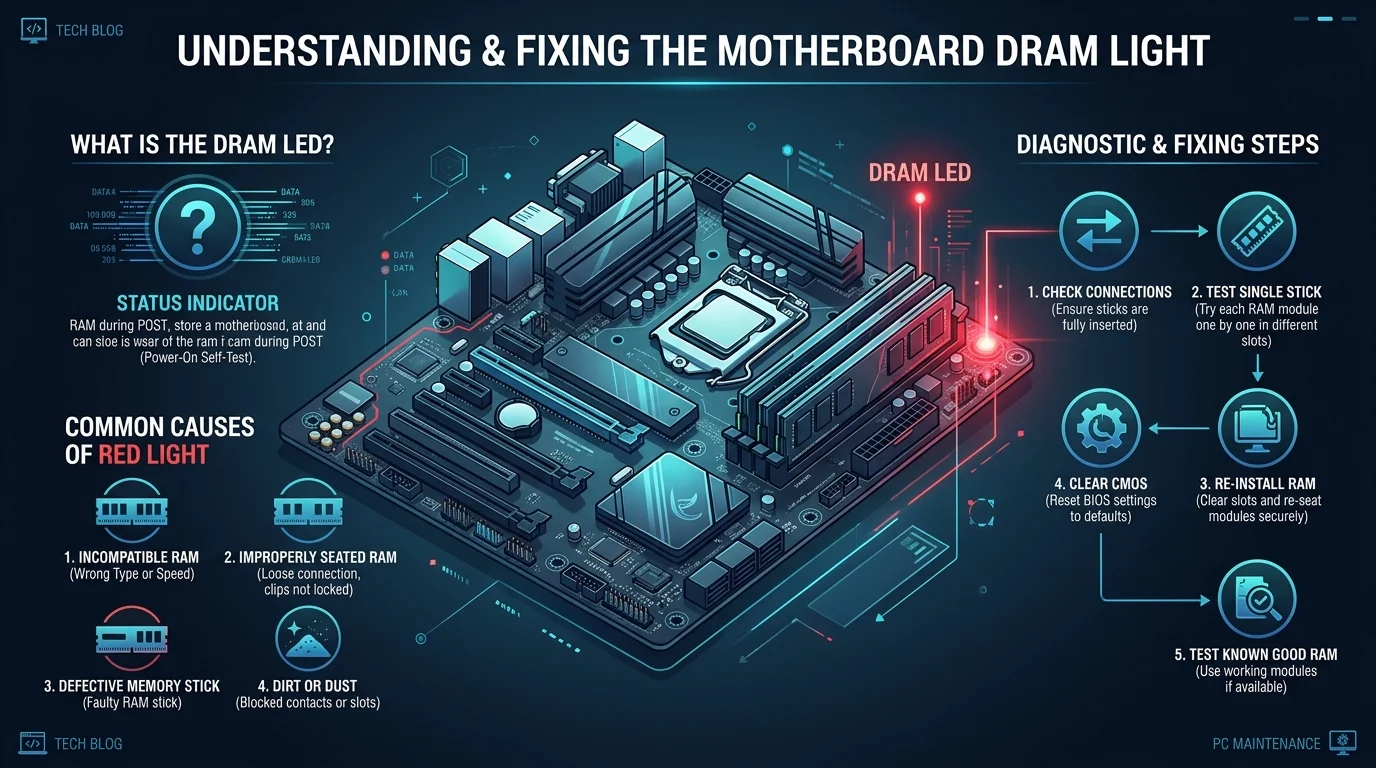
The DRAM LED is part of your motherboard's built-in debug LED system — a small set of indicator lights that show exactly where your PC's POST (Power-On Self-Test) process is failing.
Think of it like a check-engine light, but for your PC build.
According to ASUS's own official support documentation, when the DRAM LED stays continuously lit after you power on your system, it means your board can't detect your memory modules, or your RAM is faulty.
That's it. That's the whole mystery.
Translation: your motherboard is trying to say "Hey, I can't talk to your RAM right now" — and it's using a light instead of words.
Here's a stat worth knowing: on many boards, the DRAM LED is the single most common debug light to trigger, accounting for roughly 30% of all debug LED troubleshooting cases. RAM is just finicky like that.
Why Different Brands Call It Different Names
Here's something that trips up a lot of people (myself included, the first time I saw it).
Every motherboard manufacturer slaps their own branded name on this same basic feature. Same job, different label. Here's the breakdown:
Brand | LED System Name | Typical Location | Check Order |
|---|---|---|---|
ASUS | Q-LED | Near 24-pin ATX / DIMM slots | BOOT → VGA → DRAM → CPU |
MSI | EZ Debug LED | Right side of PCB | CPU → DRAM → VGA → BOOT |
Gigabyte | Status LED | 2x2 array under 24-pin | Varies by model |
ASRock | Dr. Debug / CPU-DRAM-VGA-BOOT | Near DIMM slots | CPU → DRAM → VGA → BOOT |
And by the way — don't panic if you see all four lights flash for a split second when you first power on. That's totally normal. The LEDs cycle through all four positions briefly on every boot. It's only a problem when the DRAM light stays lit and your system just... stops.
What Do the DRAM Light Colors Mean?
This part varies by brand, so treat it as a general guide rather than gospel — always double-check your specific board's manual.
Color | General Meaning | Urgency |
|---|---|---|
Green | RAM detected and working fine | None |
Yellow/Amber | RAM initializing (should turn off shortly) | Low — wait it out |
Red | Memory error — something's wrong | High — troubleshoot now |
Orange | RAM not currently in use | Medium |
White | RAM actively in use | None |
Top Causes of the DRAM Light Turning On
Alright, let's get into the "why."
I've broken this down into the most common culprits, ranked by how often I actually see them in the wild.
1. Your RAM Isn't Fully Seated
This is, hands down, the #1 cause.
I can't tell you how many times I've been building a PC late at night, gotten a DRAM error, panicked for ten minutes — only to realize my RAM stick wasn't fully clicked into place.
Improper seating happens more than you'd think, especially if you're new to building.
2. Dirty or Dusty RAM Slots
Yep. Dust is the enemy.
If there's dirt on the memory pins or the memory slot itself, your motherboard can lose the connection entirely — even if the stick looks perfectly seated.
3. Incompatible RAM Modules
Not all RAM works with all boards. Shocking, I know.
Every board has something called a QVL (Qualified Vendor List) — basically a tested, approved list of RAM kits guaranteed to work. If your kit isn't on it, you might be rolling the dice, especially with high-speed DDR5 kits or aggressive XMP profiles.
4. Outdated BIOS
This one's sneaky.
Newer CPUs sometimes need updated BIOS microcode to talk properly with your RAM. Without it, you can get a nasty combo: a red CPU light paired with an amber DRAM light — which usually means your BIOS doesn't have the microcode support for your newer processor. This is especially common on newer AM5 and Intel Core Ultra platforms paired with older boards.
5. Dual-Channel Configuration Mistakes
If you're running two or four sticks, slot order actually matters.
A wrong dual-channel configuration — sticks in the wrong slots — can trigger the DRAM light even when every individual stick works perfectly fine on its own.
How To Fix the DRAM Light: Step-By-Step Guide
Okay, enough theory. Let's fix this thing.
I'm going to walk you through this in the exact order I troubleshoot it myself — from easiest to most advanced. And here's some good news to keep you motivated: in real-world builder communities, over 70% of DRAM light issues get resolved within 15 minutes using this exact approach.
Step 1: Power Down and Unplug Everything
Safety first, always.
Turn off your PC completely and unplug it from the wall. You don't want static electricity anywhere near your DIMM slots.
Step 2: Reseat Your RAM
Pop each RAM stick out, gently.
Then push it firmly back into its slot until you hear (or feel) that satisfying click on both sides.
Pro tip: align the notch on the RAM stick perfectly with the slot. It only goes in one way.
Step 3: Clean the Contacts
Grab a soft, dry cloth or a can of compressed air.
Gently wipe down the gold RAM pins, and blow out the slot itself. Dust buildup is more common than you'd expect, especially in older builds.
Step 4: Test One Stick at a Time
If you've got multiple RAM sticks, this step is huge.
Remove all but one module, and boot with just that single stick installed — in the slot recommended by your manual (usually the one closest to the CPU).
If it boots fine, repeat with each other stick individually. This helps you isolate exactly which module (if any) is faulty.
Step 5: Check the QVL List
Head to your motherboard manufacturer's website and search your board's Qualified Vendor List.
If your RAM kit isn't listed, that doesn't always mean it won't work — but it does raise your odds of running into compatibility headaches, especially with DDR4 or DDR5 kits running custom XMP profiles.
Step 6: Update Your BIOS
If reseating and testing don't solve it, your BIOS might be the real problem.
Most modern boards now offer a way to flash your BIOS without even needing a CPU installed — ASUS calls theirs BIOS FlashBack, MSI has their Flash BIOS Button. Both work basically the same way: rename the BIOS file, drop it on a FAT32 USB drive, plug it into the labeled port, and hold the button.
Step 7: Clear CMOS
Still stuck? Time for a CMOS reset.
This resets your BIOS settings back to factory defaults, which can resolve weird voltage or overclocking conflicts that might be triggering the DRAM light.
Step 8: Inspect the CPU Socket
Last resort, but important.
Sometimes a DRAM error isn't even about the RAM — it's about bent pins in your CPU socket disrupting the whole communication chain. Take a flashlight and look closely. Handle with extreme care if you spot anything.
When To Just Replace Your RAM
Here's the honest truth: sometimes RAM just dies.
If you've gone through every step above and you're still staring at that light, it might genuinely be a faulty stick.
At that point, I'd strongly recommend investing in a QVL-certified RAM kit specifically matched to your motherboard model. It sounds like overkill, but trust me — buying RAM that's already been tested and verified with your exact board saves you hours (and possibly days) of troubleshooting down the road.
It's a small upfront cost for a whole lot of peace of mind.
Frequently Asked Questions
Is the DRAM light always red?
No. Color meaning varies by manufacturer. On most boards, red typically signals an active error, while yellow or orange can mean initialization or standby — not necessarily a fault. Always check your specific motherboard manual to confirm.
Can a DRAM light mean my motherboard is dead?
Rarely. In the vast majority of cases, the DRAM light points to a RAM seating issue, compatibility problem, or outdated BIOS — not a dead board. A dead motherboard is possible, but it's the least likely explanation and should be your last conclusion, not your first.
Why does my DRAM light flash instead of staying solid?
Flashing during the first second or two of boot is completely normal — it's just the debug system cycling through checks. A solid, unmoving DRAM light that stops your system from progressing is the actual problem to solve.
Does a new CPU trigger the DRAM light?
Yes, this happens often. Pairing a newer CPU (like a Ryzen 9000 series or Intel Core Ultra 200 chip) with an older motherboard that hasn't had a BIOS update can cause exactly this issue, since the board doesn't yet have the microcode to recognize the new processor properly.
How do I fix the DRAM light without a display?
Most boards let you flash the BIOS from a USB drive using a dedicated button (ASUS BIOS FlashBack, MSI Flash BIOS Button) — no display, GPU, or even CPU required in some cases. Check your board's manual for the exact button location and file-naming requirements.
Final Thoughts
At the end of the day, the DRAM light on motherboard almost always comes down to one of a handful of fixable issues: a loose stick, a dirty slot, an incompatible kit, or an outdated BIOS.
Work through the steps above in order, stay patient, and you'll very likely have your PC booting again well within 15 minutes.
And if it turns out to be a dead RAM stick? Consider it a good excuse to upgrade to a properly QVL-tested kit built for your exact board — it's the kind of small investment that saves you from ever staring at this light again.