
Setting up a router takes about 15 to 20 minutes if you have everything ready before you start. You'll need the router itself, your modem, an Ethernet cable, and a device to log into the admin panel. Most routers use a default IP address like 192.168.1.1 or 192.168.0.1 to access the setup screen. Once you're in, you'll rename your Wi-Fi network, set a strong password, and turn on WPA3 security to keep your connection protected. I'll walk you through every single step below, so grab your router and let's get started.
Why Setting Up Your Router Correctly Actually Matters
A poorly configured router leads to slow speeds, dead zones, and a network that's wide open to anyone nearby. That's the short version. But here's the thing, you.
Most people just plug in their router, connect to whatever default network shows up, and never touch it again. And honestly? That works, for a while. But that default setup is usually running on factory settings, which means a generic SSID, a weak or default admin password, and often an outdated security protocol.
According to the NSA's home network security guidance, millions of routers still ship with factory credentials like admin/admin, and attackers keep running lists of these defaults on hand specifically to exploit them. So a few extra minutes now saves you a real headache later, whether that's a sluggish connection or a stranger riding your Wi-Fi.
If your Wi-Fi already feels sluggish, our guide on speeding up a slow home network covers fixes beyond initial setup.
What You Need Before You Start
You don't want to be halfway through setup and realize you're missing a cable. So let's fix that right now.
Here's your checklist:
Your router (unboxed, with antennas attached if they're separate)
Your modem already connected and working (skip this if you have a fiber ONT instead)
An Ethernet cable (usually included in the box)
A laptop, phone, or tablet for configuration
Your router's default login info (printed on a sticker on the device)
Your internet provider's account details, in case you're on PPPoE or a static IP
Got all that? Good. Let's move on to the actual setup.
Router vs Modem vs Mesh System: A Quick Breakdown
People mix these terms up constantly, so here's the short version before you start.
Your modem connects your home to your internet provider. Your router creates the local network inside your home and directs traffic between your devices and that modem connection. A mesh Wi-Fi system uses multiple routers (nodes) working together to blanket a larger home in coverage, which is worth considering if a single router leaves dead zones, as noted in HighSpeedInternet.com's mesh setup guide.
Device | What It Does | Best For |
|---|---|---|
Modem | Connects your home to your ISP's internet signal | Every home needs one (or an ONT for fiber) |
Router | Creates your local Wi-Fi and wired network | Apartments and small-to-medium homes |
Mesh System | Multiple linked nodes extending coverage | Larger homes, multiple floors, thick walls |
If you live in a small apartment, one router is plenty. Bigger home, multiple floors, thick walls? A mesh system will save you a lot of frustration. See our comparison of the best mesh Wi-Fi systems if that's your situation.
Step-by-Step Guide: How to Set Up a Router
This is the part you came here for. Follow these steps in order, and don't skip the security ones at the end, they matter just as much as getting online.
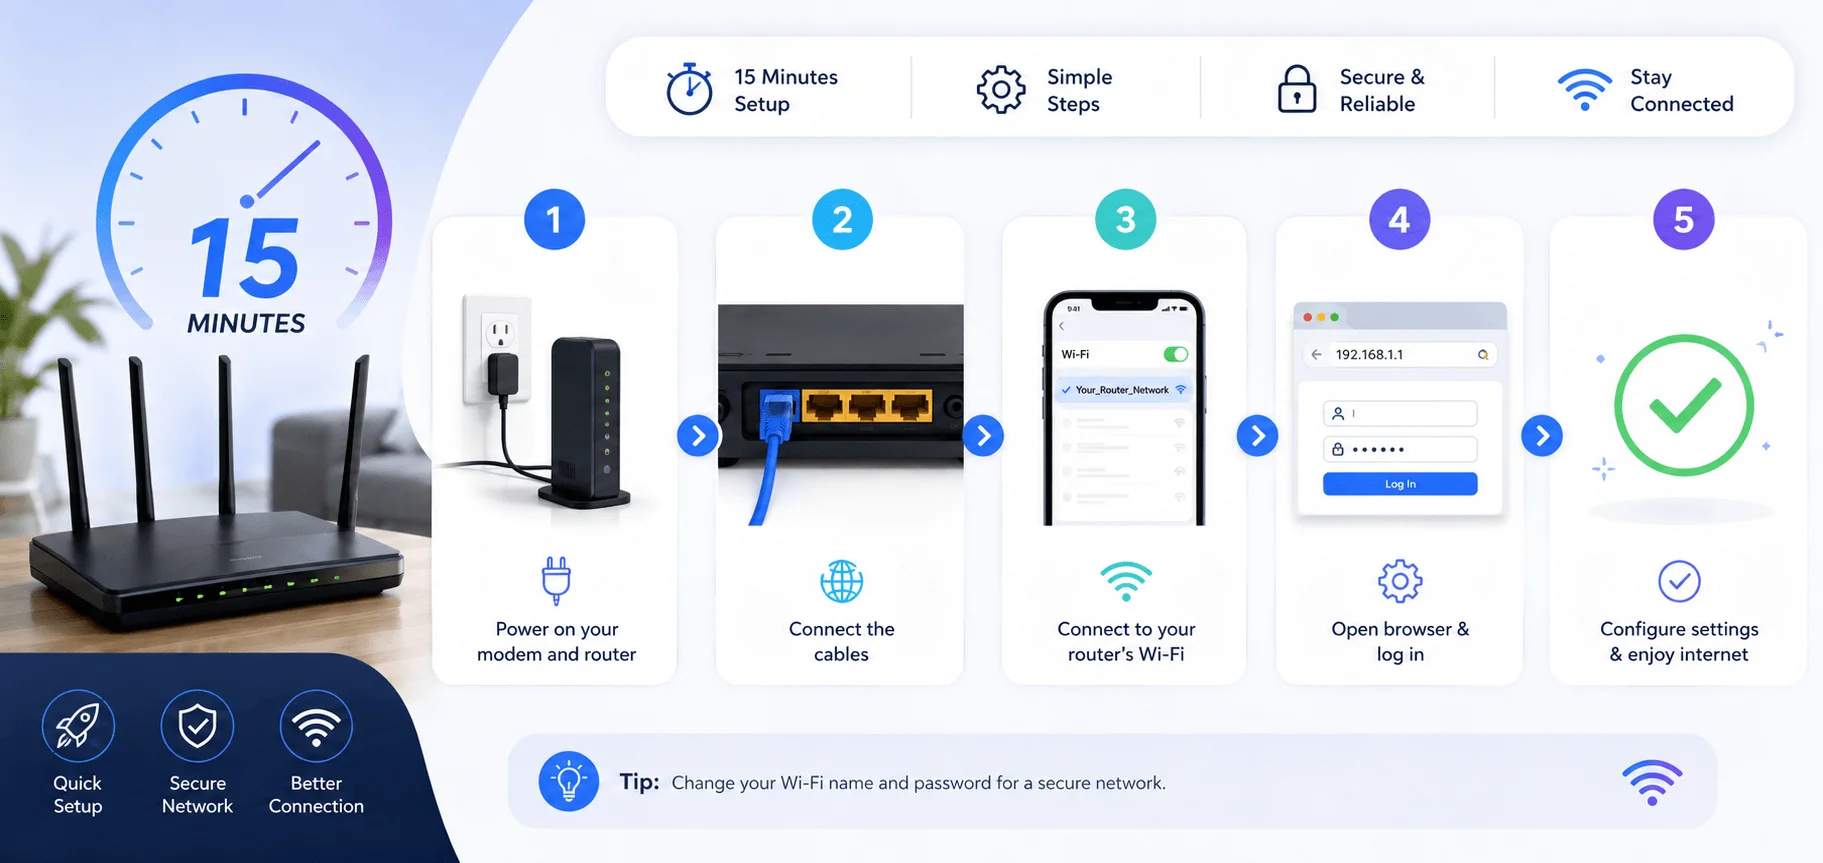
Step 1: Position Your Router and Power It On
Where you put your router genuinely changes how well your Wi-Fi performs. I'm not exaggerating here.
Place it somewhere central and elevated, away from thick walls, metal objects, and appliances like microwaves that can cause wireless interference. Avoid closets, basements, and corners of the house. According to HP's setup guide, router placement significantly impacts wireless performance, so this isn't a step to rush through.
Plug in the power adapter and give it a minute or two to fully boot up.
Step 2: Connect the Router to Your Modem
Now grab that Ethernet cable.
Plug one end into your modem and the other into the port on your router labeled WAN or Internet (it's usually a different color from the other ports). If you're replacing an existing gateway, Cisco's setup guide recommends turning off the old gateway first, unplugging its LAN cable, and connecting that same cable to your new router's WAN port instead.
Wait for the lights to stabilize. You'll usually see a solid power LED and a blinking WAN light once the router starts communicating with the modem.
Step 3: Connect Your Device to the Router
You've got two options here, wired or wireless. Honestly, wired is better for the initial setup because it avoids random connection hiccups.
Wired: Plug an Ethernet cable from your computer into one of the router's LAN ports.
Wireless: Connect to the router's default Wi-Fi network name, which you'll usually find printed on a sticker on the device itself.
Either way works fine for accessing the setup screen.
Step 4: Log Into the Router's Admin Panel
Open a browser and type in your router's default gateway address. This is typically 192.168.1.1, 192.168.0.1, or routerlogin.net for NETGEAR devices, according to NETGEAR's own installation guide.
Can't find it? Here's a quick workaround:
Windows: Open Command Prompt, type
ipconfig, and look for "Default Gateway"Mac: Go to System Settings → Network → Details → Router
Enter the default username and password (again, check that sticker). You'll want to change this password almost immediately, which brings us to the next step.
Step 5: Configure Your Internet Connection Type
Most routers auto-detect your connection type, but it's worth double-checking. Your options usually include:
DHCP (automatic, most common for cable and fiber)
PPPoE (requires a username and password from your ISP)
Static IP (manually entered, less common for home use)
Your internet provider will tell you which one applies to your setup if you're unsure.
Step 6: Set Your Wi-Fi Network Name and Password
Now for the fun part, making your network actually yours.
Choose an SSID that doesn't include your name, address, or apartment number (you don't want to broadcast personal details to every device scanning nearby networks). Then set a strong, unique Wi-Fi password. Skip the dictionary words and go for length over complexity, a long passphrase beats a short complex one nearly every time.
If your router supports dual-band or tri-band Wi-Fi, you'll see separate settings for the 2.4GHz band and 5GHz band. The 2.4GHz band covers more distance but runs slower; the 5GHz band is faster but has shorter range. Most modern routers let you rename both the same, and the router handles switching devices between them automatically.
One more thing worth knowing at this stage: every device that connects to your router has a unique MAC address. You'll need it later if you ever want to set up device-specific filtering or troubleshoot which gadget is hogging your bandwidth.
Step 7: Enable WPA3 Security (or WPA2/WPA3 Transitional)
This step is non-negotiable, in my opinion.
Navigate to the wireless security settings and select WPA3-Personal if your devices support it. According to Apple's official Wi-Fi security recommendations, WPA3 is currently the strongest available protocol for home Wi-Fi, offering better protection than older standards. If you've got a mix of newer and older devices, choose WPA2/WPA3 Transitional instead, it lets modern devices use WPA3 while older gadgets fall back to WPA2 without losing connection.
Avoid WEP entirely. It's outdated and offers essentially no real protection anymore.
Protocol | Security Level | Best For |
|---|---|---|
WPA3-Personal | Strongest available | Homes where every device is newer (2019+) |
WPA2/WPA3 Transitional | Strong, backward-compatible | Mixed households with older and newer devices |
WPA2-Personal (AES) | Adequate | Routers that don't support WPA3 yet |
WEP / Open Network | ❌ Not secure | Never recommended |
Step 8: Change the Default Admin Login
You changed your Wi-Fi password. Now change the admin password too, this is a separate login that controls your router's actual settings.
Millions of routers still run on factory credentials like admin/admin, and that's exactly the kind of thing attackers scan for automatically. Pick something unique, save it somewhere secure, and move on.
Step 9: Check for Firmware Updates
Your router's firmware is basically its operating system, and outdated firmware often has known security holes.
Look for a "Firmware Update" or "Router Update" section in your admin panel, usually under Advanced or Administration. Most modern routers check for updates automatically, but it doesn't hurt to trigger a manual check the first time you set things up.
Step 10: Set Up a Guest Network (Optional but Smart)
If you have visitors, smart home devices, or IoT gadgets you don't fully trust, a guest Wi-Fi network keeps them isolated from your main network. It's usually a one-click toggle in the wireless settings, and it's genuinely worth turning on. For a deeper walkthrough on isolating smart home gear, see our IoT network segmentation guide.
Router Won't Connect? Quick Troubleshooting
Sometimes setup doesn't go smoothly on the first try. Here's how to fix the most common issues before calling your provider.
Can't reach the admin panel at all. Double-check you're connected to the router (not still on your old network), then try both 192.168.1.1 and 192.168.0.1 directly in the browser address bar.
Login credentials rejected. If you've never changed them and the sticker credentials don't work, the router may need a factory reset, hold the reset button for 10 to 30 seconds, then reconfigure from scratch.
No internet after setup. Confirm the WAN cable is in the correct port (not a LAN port by mistake), and that your modem's lights show an active connection before the router even enters the picture.
Wi-Fi is slow after setup. Try switching congested devices to the 5GHz band, and confirm you're not still parked on a default channel that overlaps with a neighbor's network.
Common Router Setup Mistakes to Avoid
A few small mistakes trip up almost everyone during router setup, so let's cover them quickly.
Leaving default credentials unchanged. This is the big one. Default admin/admin logins are publicly documented and actively targeted.
Skipping firmware updates. Old firmware means unpatched vulnerabilities sitting on your network indefinitely.
Using WEP or WPA (without WPA2/WPA3). These protocols are considered broken by modern standards and shouldn't be used anymore.
Placing the router in a bad spot. Behind the TV stand, inside a cabinet, in the basement, all of these tank your signal for no good reason.
Leaving WPS enabled. WPS is convenient but has known security weaknesses, so most security guides recommend disabling it once your devices are connected.
One thing people forget: a secure router doesn't help much if the devices connecting to it are already compromised. If your phone's been acting strange lately, it's worth knowing how to remove malware from an Android device too.
Frequently Asked Questions About Router Setup
What is the default IP address for most routers?
Most routers use 192.168.1.1 or 192.168.0.1. Some brands, like NETGEAR, also let you type routerlogin.net directly into your browser instead.
Do I need a modem and a router, or just one device?
You need both functions, but they can be combined into a single device (often called a gateway), which many ISPs provide. If you're using a separate modem and router, you'll need both connected via Ethernet.
What's the best security protocol for my router?
WPA3-Personal is currently the strongest option. If some of your devices don't support it, use WPA2/WPA3 Transitional mode instead.
Can I set up a router without an Ethernet cable?
Some routers support wireless setup through a mobile app, but a wired connection for the initial configuration is more reliable and avoids random drops mid-setup.
How often should I update my router's firmware?
Check every few months, or enable automatic updates if your router supports them. Firmware updates patch security vulnerabilities as they're discovered.
Why is my Wi-Fi slow even after setup?
Router placement is the most common culprit, followed by band congestion (too many devices on 2.4GHz) and outdated firmware. Try switching devices to the 5GHz band if range isn't an issue.
Wrapping This Up
You now know exactly how to set up a router from start to finish, from unboxing to locking down your network security. The whole process really does take under 20 minutes once you've done it once, and the payoff (a fast, stable, secure home network) is worth every minute of it.
Go ahead and run through these steps now while everything's still fresh. Your future self, streaming without buffering and not worrying about who's on your network, will thank you.