
To calibrate a monitor, warm the display for 30–45 minutes, reset it to factory defaults, switch it to User or Custom mode, then run calibration software with targets of a D65 white point, gamma 2.2, and 100–120 cd/m² luminance. For measurable accuracy, use a colorimeter — built-in Windows and macOS tools rely on your eyes and can't verify results.
Now, let me guess.
You edited a photo that looked stunning on screen. Then you printed it — and it came out dark, muddy, and weirdly warm.
I've been there more times than I'd like to admit. The good news? Monitor calibration fixes th
is, and it's far less intimidating than most people assume.
In this guide, I'll walk you through exactly how I calibrate my displays, what targets to use, how often to redo it, and which tools are genuinely worth your money in 2026.
What Monitor Calibration Actually Means
Before we touch a single setting, let's get the vocabulary straight. Display calibration is the process of adjusting your screen's brightness, gamma, white point, and color gamut so it matches an agreed-upon standard. Profiling then records that behavior into an ICC profile your operating system reads. Most people conflate the two — and honestly, that's fine. What matters is the outcome: what you see becomes predictable, repeatable, and trustworthy across every device you touch.
The Three Numbers That Rule Everything
Here's the thing nobody tells beginners: monitor calibration boils down to three target values. Get these right and you've solved 90% of the problem. Get them wrong and no amount of expensive hardware will save you. I keep them written on a sticky note beside my desk, because every calibration session — regardless of software, panel, or operating system — starts by entering these exact same three fields.
White point defines the color of pure white. The industry standard is D65 (6500K), which appears as a neutral white, while uncalibrated monitors often default to 9300K (very blue-white) or 5000K (warm yellow-white).
Gamma controls how midtones ramp from black to white. The standard is 2.2 for SDR content, and incorrect gamma makes images look too dark or washed out.
Luminance is your measured screen brightness in cd/m² (nits). The 120 cd/m² setting that most software defaults to is a fair place to start, and most monitors can reach it using the OSD brightness control alone.
Simple, right?
Three numbers. That's the whole game.
A Quick Word on Delta E
You'll see Delta E quoted on every monitor spec sheet, so it's worth understanding. It's a color error score — lower means closer to the target. A value below 2.0 is considered imperceptible to the human eye, while values above 4.0 are clearly visible. Just remember that the number is meaningless without context: check which metric is quoted — Delta E 76, 94, 2000, or ΔEITP — and look for both average and maximum error, not just one attractive headline number.
Why You Should Calibrate (Even If You're Not a Professional)
I used to think color accuracy was a photographer-only obsession. I was wrong. If you sell products online, design brand assets, grade video, or just want your holiday prints to look right, an uncalibrated display is quietly costing you money and time. And the problem compounds, because your monitor isn't a fixed reference point — it's a slowly drifting one that looks worse every year without ever alerting you.
Here's what changes after a proper display calibration:
Prints match your screen. No more reprints because the lab output came back muddy.
Colors stay consistent across devices. Your work looks the same on a client's monitor as on yours.
Skin tones stop lying to you. This alone justifies the effort for portrait shooters.
Brand colors stay on-brand. Critical if color decisions affect money or client approval.
You stop second-guessing. You edit with confidence instead of squinting.
And here's the part most people miss: LCD backlights degrade over time, shifting toward blue as phosphors age, so a monitor calibrated six months ago may have drifted significantly.
Resolution matters here too, because pixel density affects how you judge detail and sharpness while you calibrate. If you're setting up a new display and still weighing panel specs, my breakdown of what 4K resolution actually means explains what those numbers deliver in real-world use.
Step 1: Prepare Your Display Before You Calibrate Anything
Most tutorials rush straight to the software. That's a mistake I made for years, and it produced mediocre profiles every single time. Proper preparation does more heavy lifting than the calibration itself does. Give your panel time to stabilize, kill every "enhancement" the manufacturer bolted on, and control your room lighting. Ten minutes of prep here saves you an hour of confused troubleshooting later — and it's completely free.
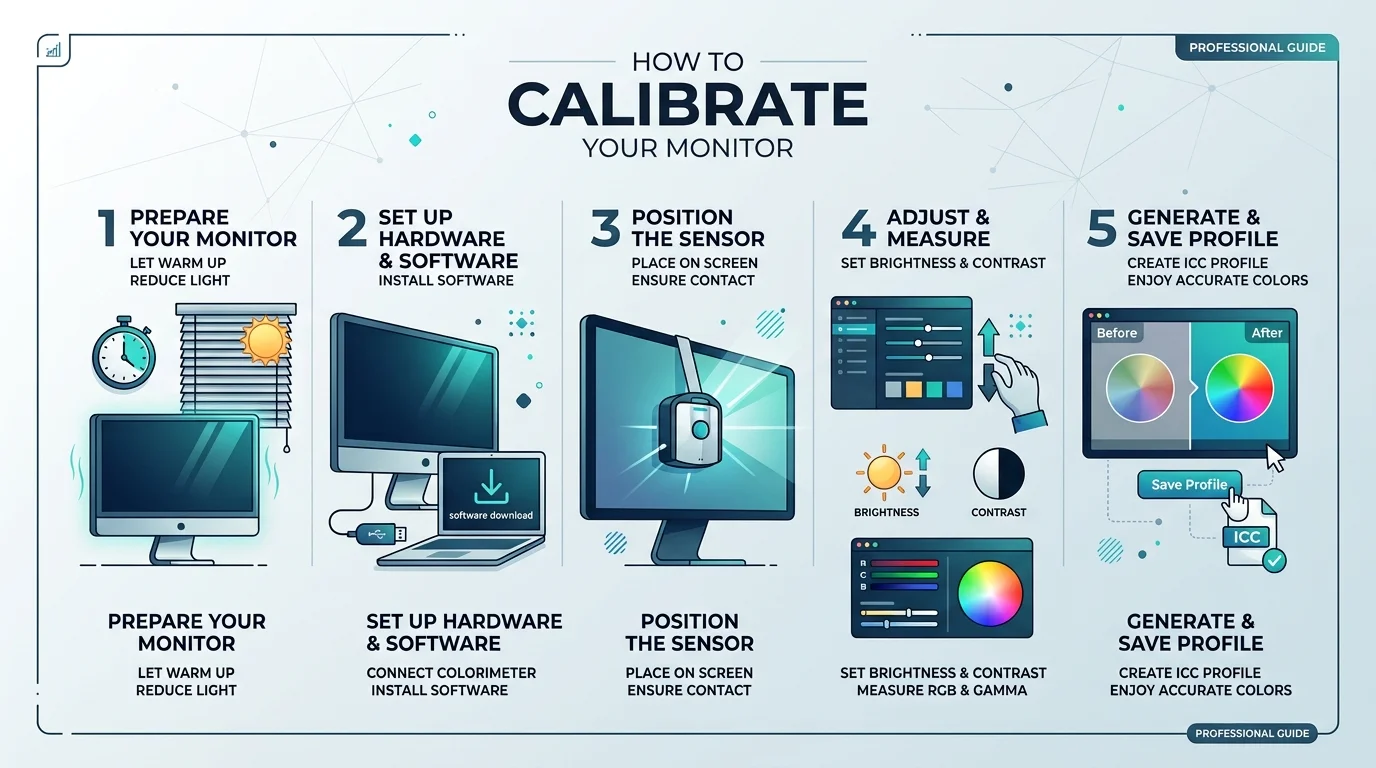
1. Warm up the panel. Panels need 30–45 minutes to reach thermal equilibrium; color output drifts until the backlight and liquid crystals stabilize.
2. Reset to factory defaults. Disable Dynamic Brightness, Dynamic Contrast, Black Equalizer, low blue light filters, MBR, and Eco/power-saving modes, and make sure your NVIDIA, AMD, or Intel graphics control panel settings — color channel, brightness, contrast, gamma, hue — are all left at default.
3. Pick the right picture mode. Set the color mode to "Custom" or "User," because presets like "sRGB" or "Movie" may lock out adjustments, and set sharpness to 50% (neutral).
4. Set native resolution and refresh rate. Scaling artifacts will skew your measurements.
5. Control your ambient light. Close the blinds. Kill the lamp behind you. Calibrate in the light you actually work in — not a dramatically darkened room you'll never use.
Step 2: The Free Route (No Hardware Required)
Not ready to spend money yet? Fair enough — and there's genuine value here. Your operating system already ships with basic calibration tools, and they'll get you maybe 60% of the way there if your screen is badly off. Just manage your expectations honestly. These methods rely entirely on your eyes, and your eyes adapt to whatever they're looking at within seconds. Still, a free pass beats doing absolutely nothing.
How to Calibrate a Monitor on Windows 11
Press Windows + S or open the Start menu, search for "calibrate display color," open the matching result, and follow the on-screen instructions. Microsoft moved this out of Control Panel into its own standalone app in Windows 11. You'll click through options for gamma and brightness with a reference image provided as a guide, then click Finish to update your settings.
How to Calibrate a Monitor on macOS
Go to the Apple menu → System Settings → Displays in the sidebar → choose your display → click the Color profile pop-up menu → select Customize → click the + button to open the Display Calibrator Assistant. It walks you through initial brightness and contrast adjustments, then setting a target white point.
Verify With Free Test Patterns
Once you've made your adjustments, pressure-test them with Lagom LCD test pages. Work through the tests in the order they're placed — the first images check brightness, contrast, and sharpness, and later tests like Viewing Angle reveal whether the display shifts in the corners. Each pattern comes with a helpful explanation, and you can even load them onto a USB drive to test monitors in a store.
But I'll be straight with you: these tools rely on visual judgments and aren't as accurate as hardware-based solutions. They cannot measure. They cannot verify. They cannot tell you your Delta E.
Step 3: How to Calibrate a Monitor With a Colorimeter (The Real Fix)
This is where everything changes. A colorimeter is a small sensor that hangs against your screen, measures hundreds of color patches, and builds a measurement-based ICC profile. No guessing. No eye fatigue. Just data. I resisted buying one for two years and regret every month of that delay — my first proper calibration explained three years of disappointing prints in about eight minutes flat.
Here's my exact workflow:
Set the monitor to User mode and reset all GPU color controls to default.
Set native resolution and refresh rate, then disable every dynamic image feature.
Launch your calibration software and enter your three targets.
Hang the colorimeter flat against the screen. Keep room lighting steady and let the software create and install the ICC profile.
Run a verification pass and read the Delta E report.
Save the profile with a date in the name, e.g. "Dell U2722D 2026-08-20."
Stop touching the OSD. Don't change brightness, contrast, RGB gains, saturation, black equalizer, GPU digital vibrance, night light, or color temperature.
Choosing Your Calibration Targets
Use a D65 (6500K) white point, gamma 2.2, and luminance of 80–120 cd/m² for print work or 120–160 cd/m² for screen-only work. Raise the target toward 140–160 cd/m² only if your desk is strongly daylit.
Editing in a dim room? Aim closer to 100.
One important caveat for print workflows: calibrating the monitor itself to 5000K for print often makes the screen look too warm and can push edits in the wrong direction.
Also worth knowing: higher luminance shortens the usable lifespan of your monitor, so it's always better to move the display somewhere darker if you can.
Step 4: Never Download Someone Else's ICC Profile
I see this "shortcut" recommended constantly in forums, and it drives me a little crazy. Someone posts a profile for your exact monitor model and it feels like free accuracy. It isn't. Panel tolerances, backlight age, firmware revision, graphics card output, and your specific room all differ from theirs. Borrowing a profile is like wearing a stranger's prescription glasses because you both bought the same frames.
Two identical displays can differ because of panel variation, backlight age, firmware, graphics card output, and operating system settings — a borrowed profile is a guess with professional-looking packaging.
That single sentence is worth the price of a colorimeter.
The same applies to manufacturer-supplied profiles. Those are generic profiles that don't account for your environment, gamma, or other external factors — measurement-based profiles will always be better.
Hardware vs. Software Calibration: What's the Difference?
This trips up a lot of people shopping for a color-accurate monitor, and the distinction genuinely matters once you're spending real money. The short version: software calibration corrects color on the way to the monitor, while hardware calibration corrects it inside the monitor. Both produce good results, but they behave very differently with non-color-managed apps, and they demand different profile setups in your OS.
Software calibration adjusts your GPU's output. The ICC profile contains LUTs and tone curves that reshape the signal before it reaches the display. It works on literally any monitor. The trade-off is that you're spending some of your GPU's bit depth, which can introduce banding on weaker panels.
Hardware calibration writes the correction into the monitor's internal look-up table. A hardware-calibrated monitor only needs a generic color profile — these tell the operating system the size and shape of the color space but do not alter the data. It's cleaner, but it requires a supported display (BenQ SW series, EIZO ColorEdge, ASUS ProArt, NEC SpectraView, and similar).
Your file format choices interact with all of this too, since compression and color depth decide how much of that hard-won accuracy actually survives export. My guide comparing JPG vs PNG covers which format protects your colors and when each one makes sense.
Why You Can't Really Calibrate HDR
Here's a limitation that surprises almost everyone who buys their first HDR monitor expecting to dial it in the same way. You largely can't. HDR mode hands control of the tone curve over to a standard, and the monitor locks out the adjustments you'd normally use. This isn't a flaw in your hardware or your software — it's how the format works, and televisions face the same constraint.
Monitors almost always rely on the HDR10 standard, and treat HDR just like sRGB or DCI-P3 mode — activating it locks the monitor to settings meant to conform to the standard, disabling the image quality adjustments you might normally use to calibrate.
Your practical options:
Calibrate a solid SDR baseline and treat HDR as a separate viewing mode.
On Windows 11, use Microsoft's HDR Calibration app from the Microsoft Store, which also calibrates how SDR content appears on your HDR display.
For video work, generate a 3D LUT instead of an ICC profile.
How Often Should You Recalibrate Your Monitor?
This is the single most-asked follow-up question I get, and the honest answer is "it depends" — which is useless, so let me give you real numbers instead. Manufacturers, standards bodies, and working professionals all recommend different intervals, and the gap between them is wider than you'd expect. What matters more than any calendar is knowing which events force an immediate recalibration.
Your use case | Recommended interval |
|---|---|
Paid color-critical work (print, grading) | Every 2–4 weeks |
Regular photo or video editing | Monthly |
Hobbyist / mixed creative use | Every 2–3 months |
Office, gaming, general use | Every 3–6 months |
Datacolor recommends monthly recalibration, while X-Rite suggests a range from once or twice a month for hobbyists to weekly or even daily for professional users. The ICC notes that displays drift and that roughly 6-month intervals are often sufficient, though critical environments may need more frequent checks.
Recalibrate immediately — regardless of the calendar — whenever the output path changes. That includes switching picture modes, enabling HDR, changing brightness, adjusting RGB gain, installing a new GPU driver, replacing a cable, or moving the screen to a room with different lighting.
And if you run multiple screens: calibrate each one separately, because even identical models can vary.
The Best Monitor Calibrators to Buy in 2026
You've got three realistic price tiers, and every one of them beats guessing with your eyeballs. Calibration hardware has gotten dramatically cheaper, faster, and easier over the past few years, so the old "that's only for professionals" excuse simply doesn't hold anymore. Pick based on your panel technology and whether HDR is part of your workflow — those two factors matter far more than brand loyalty.
Tier | Product | Price | Max Brightness | Best For |
|---|---|---|---|---|
Budget | Datacolor SpyderExpress | $99 | SDR displays | Fastest setup — calibrates in 90 seconds |
Entry | Calibrite Display 123 | $119 | SDR displays | Beginners — guided 1-2-3 workflow, dual display support |
Best overall | Datacolor SpyderPro | ~$250 | 12,000 nits | OLED, mini-LED, Apple XDR; 3D LUT export |
Pro / HDR | Calibrite Display Plus HL | ~$350 | 10,000 nits | Broadcast Rec.709 and BT.1886, validation tools |
My recommendation: if you edit photos or video with any regularity, buy the Datacolor SpyderPro. It supports OLED, mini-LED, and Apple XDR displays with 3D LUT export and Device Preview Plus for cross-monitor matching — which means it won't become obsolete the moment you upgrade to an OLED panel. If you're purely testing the waters on a standard SDR display, the Calibrite Display 123 at $119 is the lowest-risk entry point on the market.
One accuracy note that half the internet still gets wrong: the X-Rite i1Display / Pro / Plus devices have been replaced by the Calibrite ColorChecker Display Pro / Plus. If a review still recommends "X-Rite i1Display," it hasn't been updated in years. Read More: Gaming Monitor Buying Guide 2026 | Pick Right
Free Software Worth Pairing With Your Colorimeter
Once you own the hardware, DisplayCAL is free and remarkably powerful. It calibrates and characterizes displays using many supported measurement instruments, with multi-display support, customizable whitepoint, luminance and tone response curve, verification and reporting functionality, plus video 3D LUT creation. It's free software under the GNU General Public License.
Frequently Asked Questions
Below are the questions I get asked most often about monitor calibration, answered as directly as I can. If you're skimming this guide rather than reading it end to end, this section is probably the fastest way to solve your specific problem. Each answer is deliberately short — the detailed reasoning lives in the sections above if you want to go deeper on any single point.
Can I calibrate a monitor without a colorimeter?
Yes, partially. Windows and macOS both include built-in visual calibration tools, and Lagom's free test patterns help you check gamma, black level, and contrast. However, these rely on visual judgments and aren't as accurate as hardware-based solutions. They can improve a badly wrong screen but cannot verify accuracy.
What are the best monitor calibration settings?
For most people: D65 (6500K) white point, gamma 2.2, and 100–120 cd/m² luminance. Use 80–120 cd/m² for print work and 120–160 cd/m² for screen-only work.
How long does monitor calibration take?
Budget about 45 minutes total. The measurement sequence itself takes 5–15 minutes, but the panel needs 30–45 minutes of warm-up first to reach thermal stability.
Why do my prints look darker than my screen?
Almost always because your screen is too bright. New LCDs frequently ship above 200 cd/m². A new LCD monitor is usually far too bright, which makes screen-to-print matching hard. Drop to 100–120 cd/m² and reprint.
Do I need to calibrate a factory-calibrated monitor?
Yes. Factory accuracy does not eliminate drift from your room, your settings, and long-term use. Factory calibration happened in a different environment than your desk.
Does calibration work on a laptop screen?
Yes, and it's worth doing — but manage expectations. Many laptop panels have limited gamut and shift noticeably off-axis, so you'll get consistency rather than reference-grade accuracy.
Is Delta E under 1 worth chasing?
Usually not. A well-measured Delta E 2000 result under 2 is a strong place to start, and under 1 is excellent — but the returns diminish sharply for most workflows.
Final Thoughts: Stop Guessing at Color
Learning how to calibrate a monitor isn't really a technical skill. It's a decision to stop trusting a device that was never designed to be accurate out of the box.
Start free if you need to. Run the Windows or macOS tool tonight, work through the Lagom patterns, and see how far off your screen actually is. That costs you nothing but twenty minutes.
But if color affects your income — if you sell prints, deliver client work, or manage brand assets — buy a colorimeter. The Calibrite Display 123 at $119 removes every excuse, and the Datacolor SpyderPro will still be relevant three monitors from now.
Set it up once. Recalibrate monthly. Then get back to work, knowing that what you see is what everyone else will see too