

Cleaning a keyboard properly takes about 10 to 15 minutes and requires just a few basic tools: compressed air, isopropyl alcohol, a microfiber cloth, and cotton swabs. You unplug the keyboard, shake out loose debris, blast it with compressed air, then wipe it down with a lightly dampened cloth. For deeper cleans, especially on mechanical keyboards, you'll also want to remove and soak the keycaps. This guide walks through every step for desktop, laptop, and gaming keyboards, along with how often you should actually be doing this.
I'll be honest with you, though. I ignored my own keyboard for years.
I wiped my desk, dusted my monitor, even cleaned my mouse pad. But the keyboard? Never touched it. Then one day I flipped mine over and, well, let's just say I lost my appetite for a while.
If you're here, you probably know that feeling too. Maybe you just found a mystery crumb wedged under your spacebar. Or maybe you read that keyboards carry more bacteria than toilet seats and panicked a little. Either way, you're in the right place.
If you're setting up a proper work-from-home space, keyboard hygiene is one of those small habits that's easy to overlook but makes a real difference
Why Cleaning Your Keyboard Actually Matters
Let's get the "why" out of the way first, because I know some of you are thinking, "it's just a keyboard, who cares."
Your keyboard is one of the most touched objects in your entire day. You eat near it. You cough near it. You touch it after touching literally everything else. Over time, that adds up to something genuinely gross.
Researchers at the University of Arizona found that an average keyboard can carry up to 400 times more bacteria than a toilet seat. Not "kind of dirty." Four hundred times dirtier.
And it's not just bacteria for bacteria's sake. A 2011 study published in the American Journal of Infection Control, still one of the most cited pieces of research on this topic, found that regular disinfection genuinely reduces microbial contamination, and that simple reminders to clean keyboards boosted cleaning compliance to 87% in one workplace program. While that data is over a decade old, more recent hygiene audits, like the 2025 CWS workplace hygiene report, confirm the same pattern still holds: keyboards remain one of the dirtiest surfaces in any office.
Beyond hygiene, there's a practical side too. Dust, crumbs, and skin oils cause sticky keys, inconsistent key travel, and eventually permanent damage to your switches. So really, you're not just cleaning your keyboard for your health. You're cleaning it to make it last longer and feel better under your fingers.
Just like calibrating your monitor keeps your display performing the way it should, cleaning your keyboard keeps it responsive and comfortable to use every day
What Happens If You Never Clean It
Picture this. You spill coffee. You don't clean it properly. Weeks later, your "E" key sticks every third press.
That's not bad luck. That's buildup.
Skin cells, food particles, dust, and moisture combine into this grimy layer under your keys. Left alone, it can:
Cause keys to register inconsistently or not spring back at all
Trap moisture that corrodes internal contacts
Create a breeding ground for mold and bacteria
Shorten the lifespan of your switches, especially on mechanical boards
So yeah. It's worth the ten minutes.
What You'll Need Before You Start
Before you dive in, gather your tools. Trust me, stopping halfway through to hunt for a cotton swab is annoying.
Here's a quick breakdown of your options, since not every tool works for every job:
Tool | Best For | Cost | Effectiveness |
|---|---|---|---|
Compressed air | Loose dust, crumbs between keys | $5–$10 | High for surface debris |
Isopropyl alcohol | Removing oils, disinfecting | $3–$6 | High for grime and germs |
Cleaning putty/gel | Hard-to-reach gaps, no disassembly | $6–$12 | Medium, good for quick cleans |
Keycap puller + soap water | Deep cleaning mechanical boards | $2–$5 | Highest, but time-consuming |
Microfiber cloth | Wiping surfaces, everyday upkeep | $3–$8 | Medium, best for maintenance |
Your basic keyboard cleaning kit should include:
Compressed air canister (or an electric duster if you clean often)
Isopropyl alcohol (90%+ concentration works best)
A soft microfiber cloth
Cotton swabs
A soft-bristled brush (an old toothbrush works fine)
A keycap puller (only needed for mechanical keyboards)
Mild dish soap and warm water
Optional: cleaning putty or cleaning gel for hard-to-reach spots
You probably already own half of this. The rest is a few dollars at most.
Step-by-Step: How to Clean a Keyboard (Quick Method)
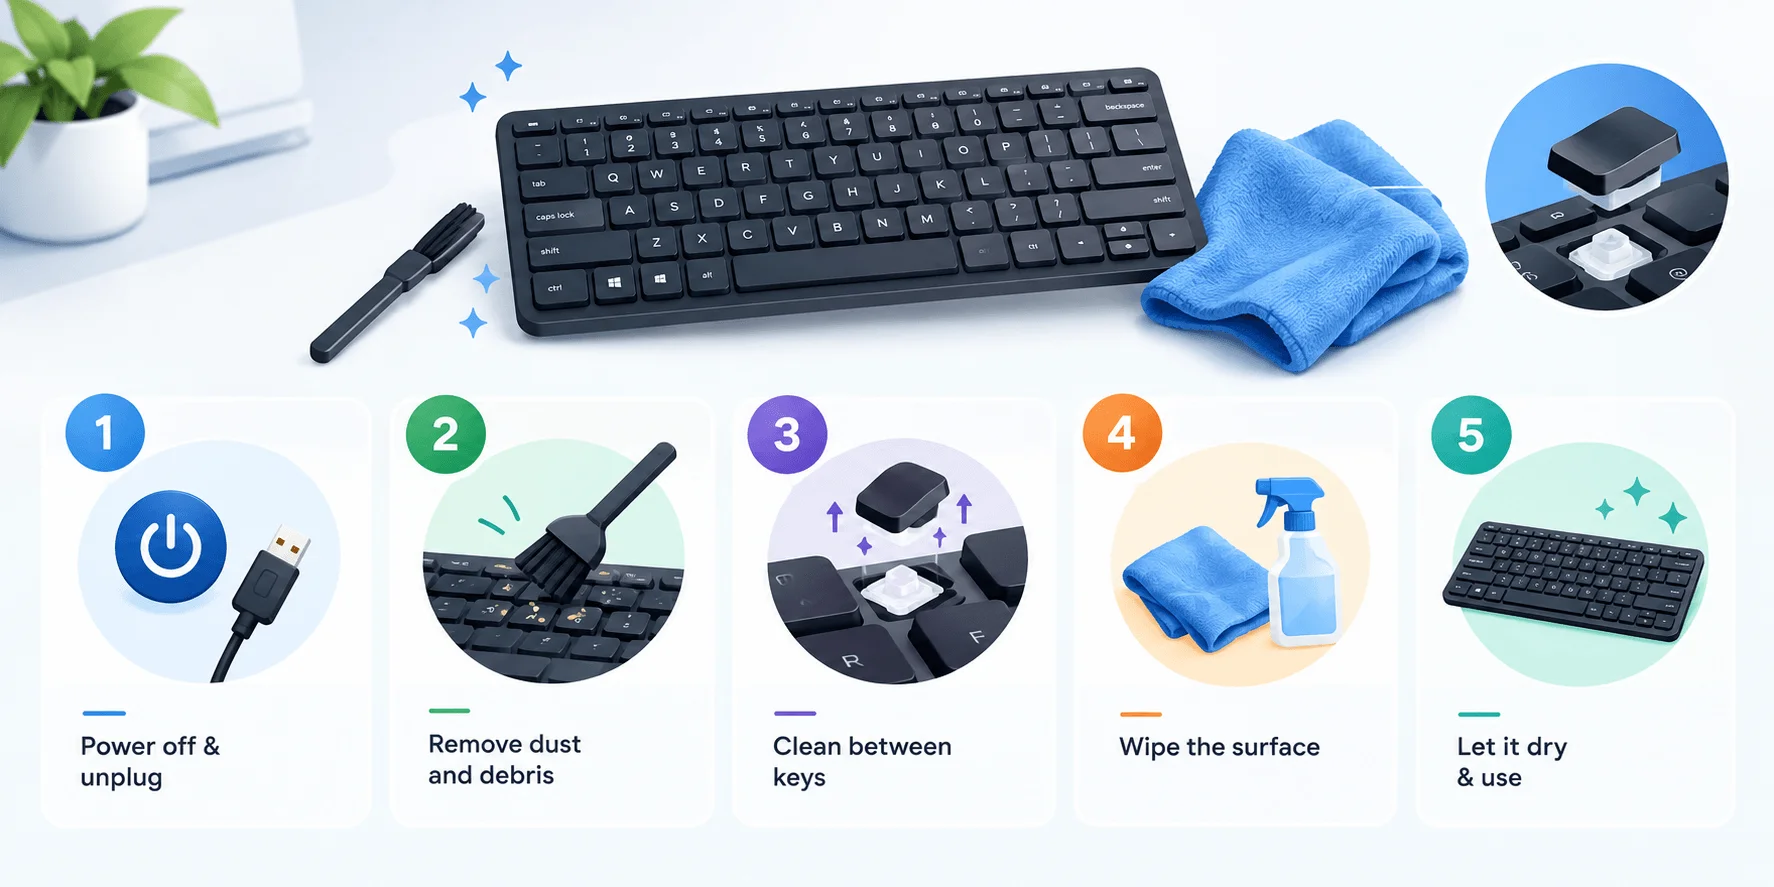
This is your everyday clean. Do this weekly and you'll rarely need the deep clean version.
Step 1: Unplug It First
I can't stress this enough. Always unplug your keyboard, or shut down your laptop, before you touch it with liquid or air. This protects you from accidental keystrokes and protects your keyboard from electrical mishaps.
Step 2: Turn It Upside Down and Shake
Flip your keyboard over and gently shake it. You'll be shocked at what falls out. Crumbs, hair, dust, the occasional mystery object you swear you never dropped there.
Give it a few gentle taps on the back too, especially around the middle where most debris settles.
Step 3: Blast It With Compressed Air
Now grab your can of compressed air and spray between the rows of keys at an angle. This dislodges the finer dust that shaking alone won't remove.
One important warning here: don't tilt the can upside down. Doing that can release liquid propellant onto your keyboard, which is the opposite of what you want.
Step 4: Wipe Down With a Microfiber Cloth
Dampen your microfiber cloth, not soak it, with a bit of isopropyl alcohol. Wipe across the tops of the keys and the surrounding surface.
This step handles the oily residue your fingers leave behind every single day, even if you don't notice it.
Step 5: Get Into the Gaps
Dip a cotton swab in alcohol and run it along the edges of each key. This is tedious, I won't lie to you. But it's where most of the grime actually lives.
If you want to speed this part up, cleaning putty or cleaning gel works surprisingly well. You just press it into the gaps and peel it away, and it pulls the dust right out with it.
How to Deep Clean a Mechanical Keyboard
If you own a mechanical keyboard, you're actually in luck. These boards are built to be taken apart, which makes deep cleaning way easier than you'd expect.
Step 1: Document Your Layout
Before removing anything, take a photo of your keyboard. Trust me on this one. It's incredibly easy to forget where every key goes, especially if you have a non-standard layout.
Step 2: Remove the Keycaps
Use a keycap puller to gently lift each cap straight up. Start with a less important key, like a function key, so you can get a feel for the right amount of pressure before moving to your main typing keys.
Step 3: Soak the Keycaps
Place your removed keycaps into a bowl of warm water mixed with a bit of mild dish soap. Let them soak for about 30 minutes.
Step 4: Scrub Gently
After soaking, use your soft-bristled brush to scrub each keycap individually. Focus on the underside and the little grooves where dirt tends to hide.
Step 5: Rinse and Dry Completely
Rinse thoroughly under clean water, then lay the keycaps out on a towel to air dry. Reattaching damp keycaps can trap moisture inside your switches, which leads to sticky presses or worse down the line.
Give them at least a few hours. Overnight is safer.
Step 6: Clean the Exposed Switches
While your keycaps dry, take a cotton swab dipped in isopropyl alcohol and clean around each exposed switch. This removes the dust and skin oil that built up underneath, which is honestly the dirtiest part of the whole keyboard.
Step 7: Reassemble
Once everything is bone dry, match your keycaps back to their original positions using the photo you took earlier. Press each one down firmly until it clicks into place.
Cleaning Gaming and Hall Effect Keyboards
Gaming keyboards get dirty faster than most, simply because of how long people sit and type or click through matches. The cleaning process is the same as a standard mechanical board, but pay extra attention to the WASD keys and the spacebar, since those wear down and collect grime the fastest.
Hall effect keyboards, which use magnetic sensors instead of physical switch contacts, need a slightly gentler touch. Avoid soaking their internal PCB in any liquid, even if the keycaps themselves are removable and washable. Stick to compressed air and alcohol swabs for the base, and only soak the keycaps.
How to Clean a Laptop Keyboard (Without Wrecking It)
Laptops are trickier, because you can't just pop the keys off without risking damage to the internal components underneath. Laptops are trickier, because you can't just pop the keys off without risking damage to the internal components underneath. This matters even more if you're using one of the best laptops for students in 2026, since many ultra-thin models pack components tightly beneath the keys
First, shut your laptop down completely and unplug it. Don't just put it to sleep.
Second, turn it upside down at an angle and gently tap the back to loosen debris. Don't shake it aggressively like a snow globe. Laptop keyboards sit much closer to sensitive components than desktop ones.
Third, use compressed air in short bursts, holding the can upright and a few inches from the keys.
Fourth, dampen a microfiber cloth with a small amount of isopropyl alcohol and gently wipe across the surface. Avoid letting any liquid pool between the keys.
Fifth, for stubborn grime, use a cotton swab lightly dipped in alcohol to trace around each key's edge.
That's really it. Laptop keyboards reward patience more than force.
How Often Should You Actually Clean Your Keyboard?
You don't need to deep clean daily. That would honestly be overkill.
Here's a rhythm that works well for most people:
Task | Frequency |
|---|---|
Quick shake and compressed air | Weekly |
Alcohol wipe-down | Every 1–2 weeks |
Full keycap soak (mechanical only) | Every 1–2 months |
Laptop deep clean | Monthly |
If you eat at your desk often, or share your keyboard with others, lean toward the more frequent end of that range.
Common Mistakes You Should Avoid
I've made a few of these myself, so let me save you the trouble.
Using too much liquid. More alcohol doesn't mean more clean. It just means a higher chance of liquid seeping into places it shouldn't be.
Skipping the "unplug" step. It's tempting to just wipe things down while your keyboard's still connected. Don't. It's a small habit that prevents genuinely annoying problems.
Reassembling while damp. Wait until everything is fully dry before putting your keyboard back together.
Using harsh household cleaners. Bleach, ammonia-based sprays, and anything abrasive can strip coatings and damage the plastic. Stick with isopropyl alcohol.
Forgetting the underside. Dust and hair collect on the bottom of your keyboard too, not just the top.
Frequently Asked Questions
Is it safe to use isopropyl alcohol on a keyboard?
Yes, as long as it's used in small amounts and the keyboard is unplugged first. Pure isopropyl alcohol evaporates quickly and won't leave residue behind, unlike water-based cleaners.
Can I wash my keycaps in the dishwasher?
It's not recommended. The heat and water pressure can warp keycaps or wear away the printed legends. A gentle hand wash is the safer route.
How do I fix a sticky key?
Most sticky keys come from dried spills or built-up grime under the keycap. Remove the affected key, clean underneath with alcohol, dry it completely, and reattach.
Do wireless keyboards need different cleaning steps?
Not really. Remove the batteries first instead of unplugging a cable, and follow the same general process from there.
How often should I clean a shared office keyboard?
Daily wipe-downs are recommended for shared keyboards, since multiple users significantly increase bacterial transfer risk.
Final Thoughts
Cleaning your keyboard isn't glamorous. Nobody's posting about it on social media. But it takes maybe ten to fifteen minutes, and it genuinely makes a difference, both for how your keyboard feels to type on and for the germs you're not spreading to your own hands and face.
Set a recurring reminder if you have to. Future you will thank present you.