
To screen record on iPhone, open Control Center, tap the gray Record button, and wait for the three second countdown. To stop, tap the red status bar and hit Stop. Want sound? Press and hold the button first and turn on the microphone. Your clip saves to the Photos app.
Ever tried explaining a tricky setting over text and given up halfway? I have. Then I realised my phone could just film itself.
iPhone screen recording is built in, and it's free. Once it's set up, it takes about five seconds.
In this guide, I'll walk you through every step. You'll also learn how to add sound, trim clips, and fix the usual glitches.
Why Screen Recording Is Worth Learning
A screen recorder turns a confusing explanation into a clear visual. You can capture a tutorial video, save a video call, show a bug to support, or share a gameplay clip.
Honestly, it beats typing a paragraph every time.
And there's nothing extra to buy. If you already own an iPhone, you already own the tool. Thinking about upgrading? Check which iPhone has the best camera before you choose your next one.
How to Screen Record on iPhone (Numbered Steps)
Let's get into it. Follow along on your own phone.
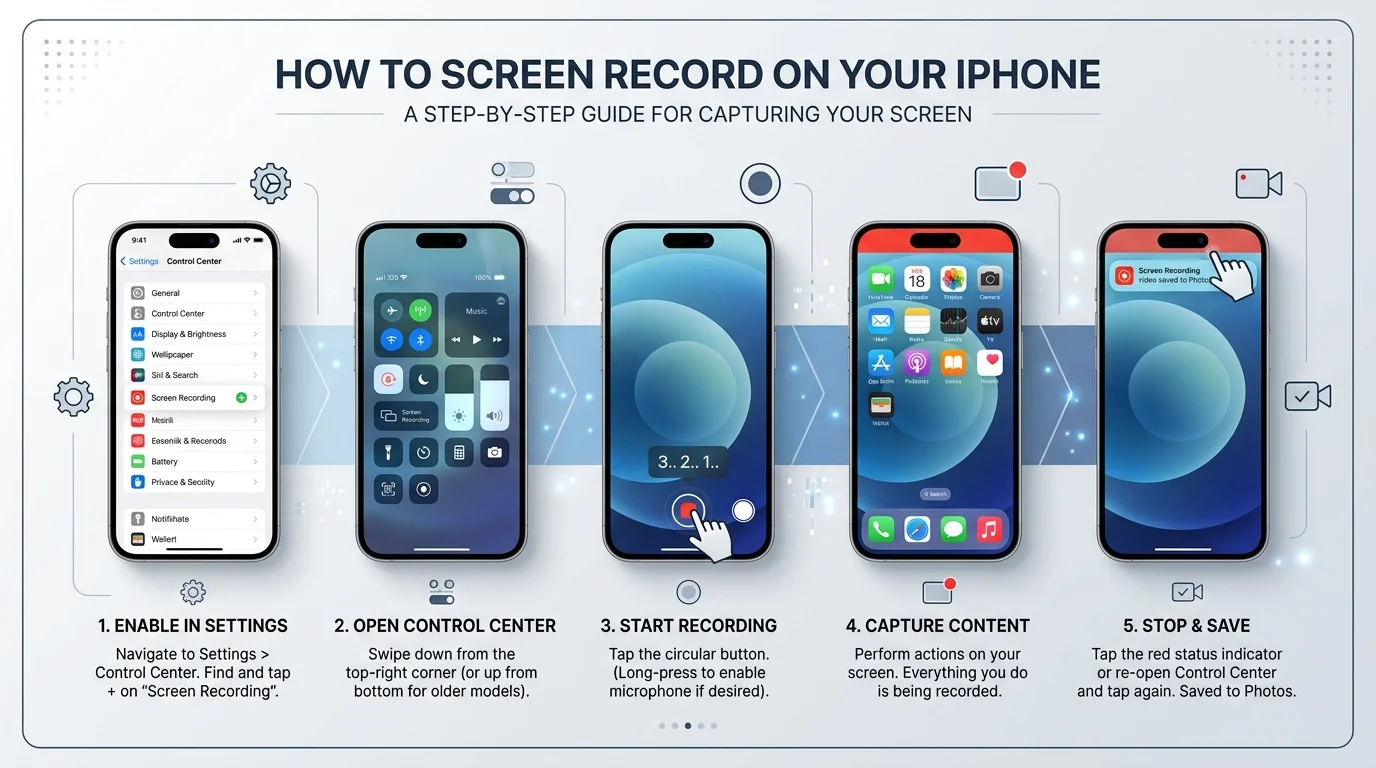
Open Control Center. On iPhones with Face ID, swipe down from the top right corner. On older models with a Home button, swipe up from the bottom.
Tap the gray Record button. You'll see a three second countdown.
Exit Control Center. Swipe it away, and your screen capture begins.
Do whatever you want to record. Open the app, scroll, tap, talk.
Stop the recording. Tap the red status bar at the top, then tap Stop. Or reopen Control Center and tap the red record icon.
Find your clip. Open the Photos app and look in your Library.
That's the whole process. BGR's walkthrough shows the same flow if you like extra visuals.
Step Zero: Add the Button to Control Center
Can't see the Record button? No worries.
On iOS 18 and newer, swipe down to open Control Center and tap the + button at the top left. Then add Screen Recording.
On older iOS versions, go to Settings > Control Center and tap the green plus next to Screen Recording, as Apple explains. There's also a handy iOS 26 setup guide if you're on the newest release.
How to Record Your Screen With Sound
Here's where people trip up. You record for two minutes, and then the clip is silent. Painful.
So here's the fix. Before you start, press and hold the Screen Recording button. A menu appears. Tap Microphone so it turns red, then tap Start Recording.
Now your voiceover and microphone audio are captured with the video. Perfect for a how to video or a narrated demo.
Prefer a quick audio note instead? Here's how to send a voice message on iPhone. And if you'd rather talk than type, see our voice text on iPhone guide.
Two quick warnings, though. Some apps block audio or video capture, according to Apple Support. And you can't use screen mirroring while you record.
My tip? Record in a quiet room. Your mic picks up everything, including the dog.
How to Edit and Trim Your Recording
Nobody nails take one. You'll have a few awkward seconds at the start and end.
Good news: you don't need heavy video editing software.
Open the Photos app, tap your video, and hit Edit. Drag the yellow trim handles to cut the extra bits. Tap Done. Apple's video editing page covers trimming and even how to undo it later.
Need more power? You can use third party apps for further polish. Want a looping clip for social media? Learn how to make a GIF from your video.
One more tip. Trim before you share. Smaller files send faster.
Planning to edit on a bigger screen? Here's how to transfer photos and videos to your computer.
Screen Recording Methods Compared
Not sure which method fits you? Here's a quick comparison.
Method | Cost | Audio | Editing | Best for |
|---|---|---|---|---|
Control Center (built in) | Free | Microphone (optional) | Trim in Photos | Quick tutorials, bug reports, everyday use |
Mac with cable (QuickTime) | Free with a Mac | Mic or system options | Mac editing tools | Longer, polished demos |
Third party apps | Free or paid | Varies by app | Often advanced | Heavy editing, special effects |
For most people, the built in option wins. It's fast, free, and already on your phone.
Screen Recording Not Working? Troubleshooting Table
Sometimes things break. Don't panic. Match your problem to the fix.
Symptom | Likely cause | Fix |
|---|---|---|
Button missing | Not added to Control Center | Add it via the + button or Settings |
Button greyed out | Screen Time restriction | Allow Screen Recording in Content & Privacy Restrictions |
Recording won't save | Full iPhone storage | Free up space, then retry |
No sound | Microphone is off | Press and hold the button, tap Microphone |
Random glitches | Software bug | Restart your iPhone or update iOS |
Still stuck? Guiding Tech and iGeeksBlog list extra fixes. Some guides also suggest turning off Low Power Mode, so try that too.
If nothing works, a factory reset on your iPhone is the last resort. Back up first.
Pro Tips for Cleaner Recordings
Here are a few habits that make your clips look professional.
Turn on Do Not Disturb. Notification banners can pop up mid recording and expose private messages.
Close unused apps. It keeps things smooth.
Charge your phone first. Long clips drain battery life.
Plan your steps. A ten second rehearsal saves a retake.
Check your storage. Video files add up fast.
Turn Your Recording Into Text
Here's a bonus most guides skip. Recorded a meeting, lesson, or demo with your voice on? You can turn the audio into searchable text.
Try an AI video transcription tool to convert your clip into a transcript. Or start with these free AI transcription options. It saves you hours of manual note taking.
Frequently Asked Questions
Can you screen record on iPhone with sound?
Yes. Press and hold the Screen Recording button in Control Center, then tap Microphone before you start. Apple notes some apps may still block audio or video.
Is there a time limit on iPhone screen recording?
No fixed limit. You can record as long as you have enough storage space and battery life, according to BGR.
Where do screen recordings go?
They save to the Photos app, in your Library.
Why is my Screen Recording button greyed out?
Usually, Screen Time restrictions are blocking it. Check Content & Privacy Restrictions and set Screen Recording to Allow.
Why can't I find the Record button?
You may need to add it. Tap the + button in Control Center (iOS 18 and newer) or visit Settings > Control Center on older versions.
Can I record my screen and use screen mirroring together?
No. Apple says you can't do both at the same time.
How do I trim a screen recording?
Open it in Photos, tap Edit, and drag the yellow handles. Tap Done to save.
Final Thoughts: Start Recording Today
You now know how to add the button, record, capture audio, trim, and troubleshoot. That's the full iPhone screen recording toolkit, and it cost you nothing.
Here's my honest take. If you teach, create, or support other people, an iPhone with this built in feature is a seriously good buy. Fast. Reliable. Always in your pocket.
So grab your phone, open Control Center, and hit record. Your first clip is three seconds away.